Pages

1/31/2014

Citrus Lane review Jan 2014

Citrus Lane's January box made Nikolas very happy. 


The shipping box had the same design on it as December's box. 
I love the white snowflake look. 


Nik grabbed for the markers first. 
These bad boys are double sided and major super awesome bonus, 
they are washable.


The box also contained an activity book.
Very age appropriate. We have not used this yet.


The upset tummy & nausea relief was my favorite item.
I just adore when Citrus Lane sends us things
Nik can use in the tub; lotions and herbal medicines,
their next addition should be kid lip-balm.


They also included a card for 20% off at Ruby Ribbon.
It appears to be another "start your own business" kit.
Buy-our-starter-bundle-and-sell-the-items-to-your-friends kind of thing. 


The best item in the entire box is a wooden assorted fruit 
set that can be cut into halves. 


This set comes with a wooden knife and bag to hold
all of your toddlers wooden fruit paraphernalia, 
as well as three pieces of fruit with very strong Velcro in the middle. 


Nik found the fruit-cutting to be extremely fascinating.
It kept him busy for quite some time.
The Velcro is strong so your toddler
will have to work to get that knife through. 


I explained to Pickles that he should not be cutting his fruits in his lap,
 as that showed a serious lack of basic knife safety and knife fundamentals.
His response "wha?".


Overall this box was loved by all.


 Do you want to try Citrus Lane for yourself?  Link here
 Get a surprise box of the best products for your child every month

1/24/2014

Super hero cuff

Nik's imagination gets bigger everyday.
I love being able to give him "props"
so he can stretch that imagination muscle. 

Currently he is all about superheroes,
and what superhero doesn't have a superhero cuff?


My intention was to make these out of thick felt & Velcro, 
or some other cuff like material.
But it occurred to me that my husband had unused 80's
 wrist bands just going to waste, so I liberated one from his stash. 


Materials:
Sweatband
Felt
Sticker back fabric stars
Fabric letter N for Pickles!

Tools:
Ruler
Pinking shears


How did I know how long to make the felt pieces? 
I just wrapped some felt around the sweatband and eyeballed it. 
Yep, I have a picture of a ruler in my tools list, but I didn't use it once. 


I learned some valuable lessons during this activity. 
First, thin felt stretches in a horrible way. 
After gluing both the felt blue pieces onto the cuff and letting it dry,
 I  pulled on the cuff to check how stretchy 
it was and pulled the darn thing out of shape.


I recovered from the stretchy felt situation and placed the
fabric sticker star and letter N over the felt blue pieces.


When I gave Nik the cuff the next morning he was psyched.
Super psyched!


He immediately ran off to be the mayor of hero town and
 take pictures of himself with his Scout phone.
He loves it! Pickles calls it his superhero wrist band.


1/15/2014

Paper wad tree


I actually had no intention of blogging about this craft,
but it turned out so cute I just had to share.

I have seen many variations of this craft online,
and I knew Nik would love it.
Because of the wading paper aspect and the glue of course.
He just loves glue.

I was not quite sure what to call this project,
the hubs advised me that it looks like a paper wad tree.
Paper wad tree it is.


Materials:
Paper to print on
Paper squares to wad

Tools:
Glue
scissors
(Only if you need to cut the squares or trim the picture)


I gathered materials, which only consisted of paper squares,
a printed picture of a tree & glue.
I had the squares from a previous project.
Found a bag of them at a craft store for 3.99.


Any project that uses glitter glue is a friend of mine. 


I found the tree template at a free printable's site.
I showed Nik had to wad the paper, explained that we
were making leaves and let him go.


He had so much fun.
And I just loved how simple it was. 


Nik told me this project made him happy. 


The result is gorgeous. I cannot wait to frame this one.

1/12/2014

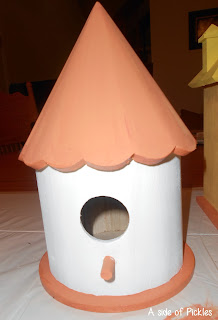
Painted bird houses

Pickles and I have decided to have a theme for our January crafts, birds!
Nik asked to paint a bird house so that the birds in our yard could have a home.
The result is adorable, and we are hearing nothing but good things
 from the bird community. 


All of our local craft stores have a great selection of unpainted bird houses.
We found two houses we liked. One has a normal sized bird hole. 


And the other is a double-decker with a mutant tiny pygmy bird hole.
I don't know what sort of super model bird will live in this home. If we don't see any birds move in within a few weeks the hubs will widen that entrance. 


Materials:
Paints
Something to put the paint on - We used paper plates
Hooks for the tops of the birdhouses
shiny, sparkly items


Tools:
brushes or sponge brushes
glue


I gathered some bird house type colors, sponge brushes and paper plates. 


My intention was to place a base color on both houses
before setting Nik free with the paint. 
It occurred to me at one point that the paint choices I made,
looked as if I was painting houses for bird clowns. 


I repainted the clown cottage a more appropriate color.


After the houses dried I gave Nik a
sponge brush, some paint and let him go.


Painting is not really his thing, but Nik was
definitely enjoying the sponge brush.
It helped him make neater designs and cover more area.


Nik kept hearing the birds in the back yard chirping while he was painting.
He insisted,
"Just hold on birdies! Be patient"


I think the paint job Nik did is fabulous.
We let the houses dry for 24 hours.


I decided we needed to add a few things to the houses
to increase the curb appeal. 
I thought that glues and glitters could kill the birds resulting in tons of tiny bird deaths on my hands. I would never be able to sleep at night, so I decided we needed to go organic.
Noodles!


The noodle idea was scrapped after my husband reminded me that I would need to use glue to make the noodles stick, and I didn't want the birds to accidentally eat glue. So we glued inedible objects instead.

I know that birds are attracted to flashy stuff, like me at Target.
So I just brought out a few fake jewels and glass thumbprints.


Nik glued our shiny objects on.
After that we set the houses to the side to dry.


Pickles was super proud of this project, and he really loved doing it. 


 My husband placed a few hooks on the top of the houses
to give us something to hang them with.
We used jute to hang the houses in trees.
 

1/06/2014

Citrus Lane review Dec 2013

I'm just going to come right out and say it, 
Citrus Lane's Dec box was less than stellar. 


Nik was super excited right away. He pulled out the
handprint art kit and handed it to me.


When he saw there was only a book, a paper and some lotion,
Nik was disappointed. 


Sad face.  "no toys?"


Once he noticed that there was a puzzle in the box all was good again.


According to Nik this puzzle is fun,
and he loves that the pieces stand up on their own. 


The book we received is awesome.
This book has become a regular in the nighttime book rotation. 
Pickles thinks it's comical that the moon has arms and legs. 


The hand print art is fabulous.
I'm always looking for new ways to preserve Nik's early years.
I love Pearhead, and am already an owner of many of their photo albums.


Of course we used the hand print kit right away.
We received the box right before Christmas and this made for a beautiful gift.
(I added a little extra periwinkle to the provided blue paint, the color is not a true representation of the color in the kit)


The box also contained a Snuggly lotion.
We have received products from this company in previous box's.
We are fans of their stuff. This lotion has a lovely cherry smell. 


Our overall impression of this box is meh.
Nik loves the puzzle and we enjoyed doing the pearhead print,
but this box lacked the usual pizzazz.


If you would like to try Citrus Lane click here